Thursday, July 19, 2012

How to Propagate Some Pretty, Poppin', Pow! with Portulaca.

Could your garden stand to use a little more “pop?” How about some “pow?” And a whole lot of “pretty?” Well, here’s a way to sneak all three into your garden. If you’ve never been introduced to Portulaca, then get ready for one of my favorite garden plants; it’ll knock your socks off!
So are you convinced that this is a must-have plant for all your sunny garden spots? Get ready for more because this plant just keeps on giving – literally! Once you have portulaca growing in your garden, it is super easy to collect and distribute seed. This is a “self-seeding” plant, which means that you can leave it alone and it will drop seed, providing for more future plants. If you are more ambitious like me, you can collect the seed, save it, and plant in different locations for the next growing season. I love to sneak it into little bare spots in my garden that need a little “Pop!” It’s also great in containers, as long as they contain proper drainage.
Here’s how to collect the seeds:
First, you will want to grab a small jar, envelope or sandwich bag to capture and contain your seeds.
Next, locate the seed head. Seed heads form wherever a flower is/was blooming. It will look like a miniature brown paper sack with the top twisted closed.


Once you’ve located the seed head, hold your container underneath the seed head. Pinch the twisted top of the seed head and pull it off.


This will reveal a little “cup” filled with extremely tiny black poppy-seed like seeds. Tilt the “cup” and shake the seeds into your container. You may have to use your fingernail to scratch the seeds out of the “cup,” depending on how moist or dry they are.


Sometimes when you pull the twisted seed head, it reveals a green or reddish cap. This means that the seed head is not dried out enough. Leave it, giving the seed head another day or two to finish drying.


Portulaca produces a million-ga-gillion seeds; really it does! One purchased plant has the potential to fill up your garden in one year’s time, if you collect and redistribute the seed. If you are a patient gardener, you will definitely reap the benefits of this pretty plant. To read up on specific seed planting instructions and soil and moisture requirements, I prefer this version. You will also find that Portulaca can really stick it out during brutal summer heat. It can also tolerate transplanting, as long as you water it in. Portulaca comes in many beautiful colors, giving a rich color palette to the ground plane.


So, now you must be convinced that this is a must-have plant for all your sunny garden spots, right? Do you have any success stories with reseeding plants that you'd like to share? What is your favorite reseeding plant? Let me know in the comments below.
All images and graphics created by Artful I Design Studio. Please do not reproduce images without permission.

Sunday, July 1, 2012

It's Going to Be 104 Degrees Today - This Landscape's On Fire!

It's a super hot week here in the South! What better time to start thinking about that firepit for the cooler, fall weather? A friend of mine asked me to create a digital makeover for a new patio that he installed.
Here's the existing patio:


And here's the patio with a digital makeover:


The completed version includes a stone firepit with grill top and a matching stone seatwall. I also added some ornamental grasses to give it a "home" in the turf grass setting and to help transition the look with the existing woodland landscape beyond.

This is going to be a great hangout spot when the weather turns cool! It will definitely be THE go-to spot for listening to the big game, roasting hotdogs and s'mores, or just snuggling with your honey-bunny! These firepits are available as kits, are very customizable, and appeal to a variety of price ranges. They are a great investment, and most importantly, will help you transform your landscape into your lifescape! Call or email me to find out more about this design service.

Monday, June 25, 2012

My Design Process: Schematic Elevation Study

One of my main goals for working with clients is to ensure that they are very satisfied with their design. Recently, I was introduced to a home owner that had paid for design services, not once, but twice, for a landscape plan of her home's front foundation. In both cases, she was left with a plan that she did not like.

That tells me that:
There must have been some sort of communication breakdown between client and designer, and,
The designer did not structure their fees to include any revisions to the plan, leaving the client unsatisfied.

After interviewing my new client I learned the following:
  • She is very concerned about her home's appearance from her driveway approaching the house.
  • She loves colorful plants that have an extended blooming season.
  • She is very influenced by tropical plants and textures.
  • She loves a mix of traditional and contemporary.
  • She desires a bold, yet simple landscape plant palette.

Over the years, I've also learned that people do not always positively respond to plans in 2D. Sometimes, it is better to present a concept in elevation, section or perspecitve views. I decided to create a concept study for this client and present it in an elevation study.

First, I photographed the facade of the home.


Second, I selected the foundation plantings and sketched those on a trace overlay.


Third, I rendered the sketch in color pencil.


Lastly, I scanned the overlay and labeled it in Photoshop. Here's the final piece:


I am addressing the clients needs by:
  • Creating a balanced planting scheme that is appealing from the driveway approach.
  • Using hardy plants that provide extended color, such as 'Natchez' Crape Myrtle, Yellow Lantana, and Red Knockout Rose.
  • Providing 3 different types of palms, plus a variety of foliage textures, to give the palette a more tropical appearance.
  • Blending two different styles by using a traditional boxwood hedge and stone wall treatment, while proving contemporary planters, freshly painted red front door, and Bahama shutters (not shown).
  • Providing a variety of bold colors and textures, while maintaining a simple, homeowner-friendly, readily available, plant palette.

Thursday, June 21, 2012

Color in the Landscape: Yellow-Orange-Pink


Do you have a favorite garden color scheme?

Photo collage created by Artful I Design Studio. Please do not reproduce photographs without permission.

Thursday, June 7, 2012

Here's the Proof: You Can Grow Collards Pretty Much Anywhere

A few weeks ago, my child was sent home with a packet of seeds from his school - collard greens, our state vegetable. We were given instructions to plant them over spring break as part of a class project on plants. We'll, um, they were planted, just using a very unconventional method. I'll explain - When I removed the seed packet from my child's book bag, it was partially opened. Seeds spilled everywhere! So, I grabbed the dustpan and swept them up, saving what seed I could for the project. And since I had the broom and dustpan out, I might as well sweep the entire house, right? I sat the dustpan out back on the deck and that was that - onto the next mommy drama episode. I suppose that dustpan sat there for awhile (please don't judge me by my less than frequent cleaning skills) because when I finally went looking for it, this is what I found:


Here's the proof that you can grow collard greens pretty much anywhere - even in dust, dog hair, and other miscellaneous crud that you sweep off your floors! In the words of Doris Day, "Que sera, sera, whatever will be, will be!"

Thursday, May 24, 2012

Three Girls and a Guy

Meet the newest members of our family. Sunday was "Make way for the Chickens" Day. We are now the official owners of Rhode Island Reds: 3 hens and one cockerel.


Rhode Island Reds are a hardy breed; happy to adapt to almost any healthy surrounding. They come highly recommended. They are also excellent layers of light brown eggs. We wanted our birds exclusively for eggs - no meat birds in our future. Did you know that the color of a chicken's ear lobe determines the egg color?


We were a little rushed to prepare the run and coop for them. The run is a old chain link dog pen that, for the last ten years, has been used as a storage area for bags of garden soil and peat moss. It was a bear to clean out. The run is located in the back corner of our lot, where grape vines and sassafrass saplings had completely "swallowed" the dog pen. It was unrecognizable. We've still got some work to do, but it looks a thousand times better!


Since they were raised together in a smaller pen, the  chickens are very happy with their new surroundings. They have lots of room to run around and scratch, peck for bugs and take a dirt bath!

 We are using an old dog house as the coop. The girls won't be ready to lay eggs until the end of the summer. My oldest son wants to paint the coop a funky color; he says it will "be fun for the chickens." Right now it's just boring beige. Did you know that chickens see in full color? I wonder if they respond to color in the way that humans do. Silly thought, I know. I just don't want to freak them out or get them "riled up" by introducing a color that they don't like. Hmm, maybe I do have too much time on my hands...

Anyways, they are here, and I am ecstatic. Thanks to our wonderful friends for raising them for us. We're probably not finished bugging you with our chicken questions, but at least you know we are finished begging you for fresh eggs!

Are any of you considering adding chickens to your family?


UFHChallenge

Tuesday, May 22, 2012

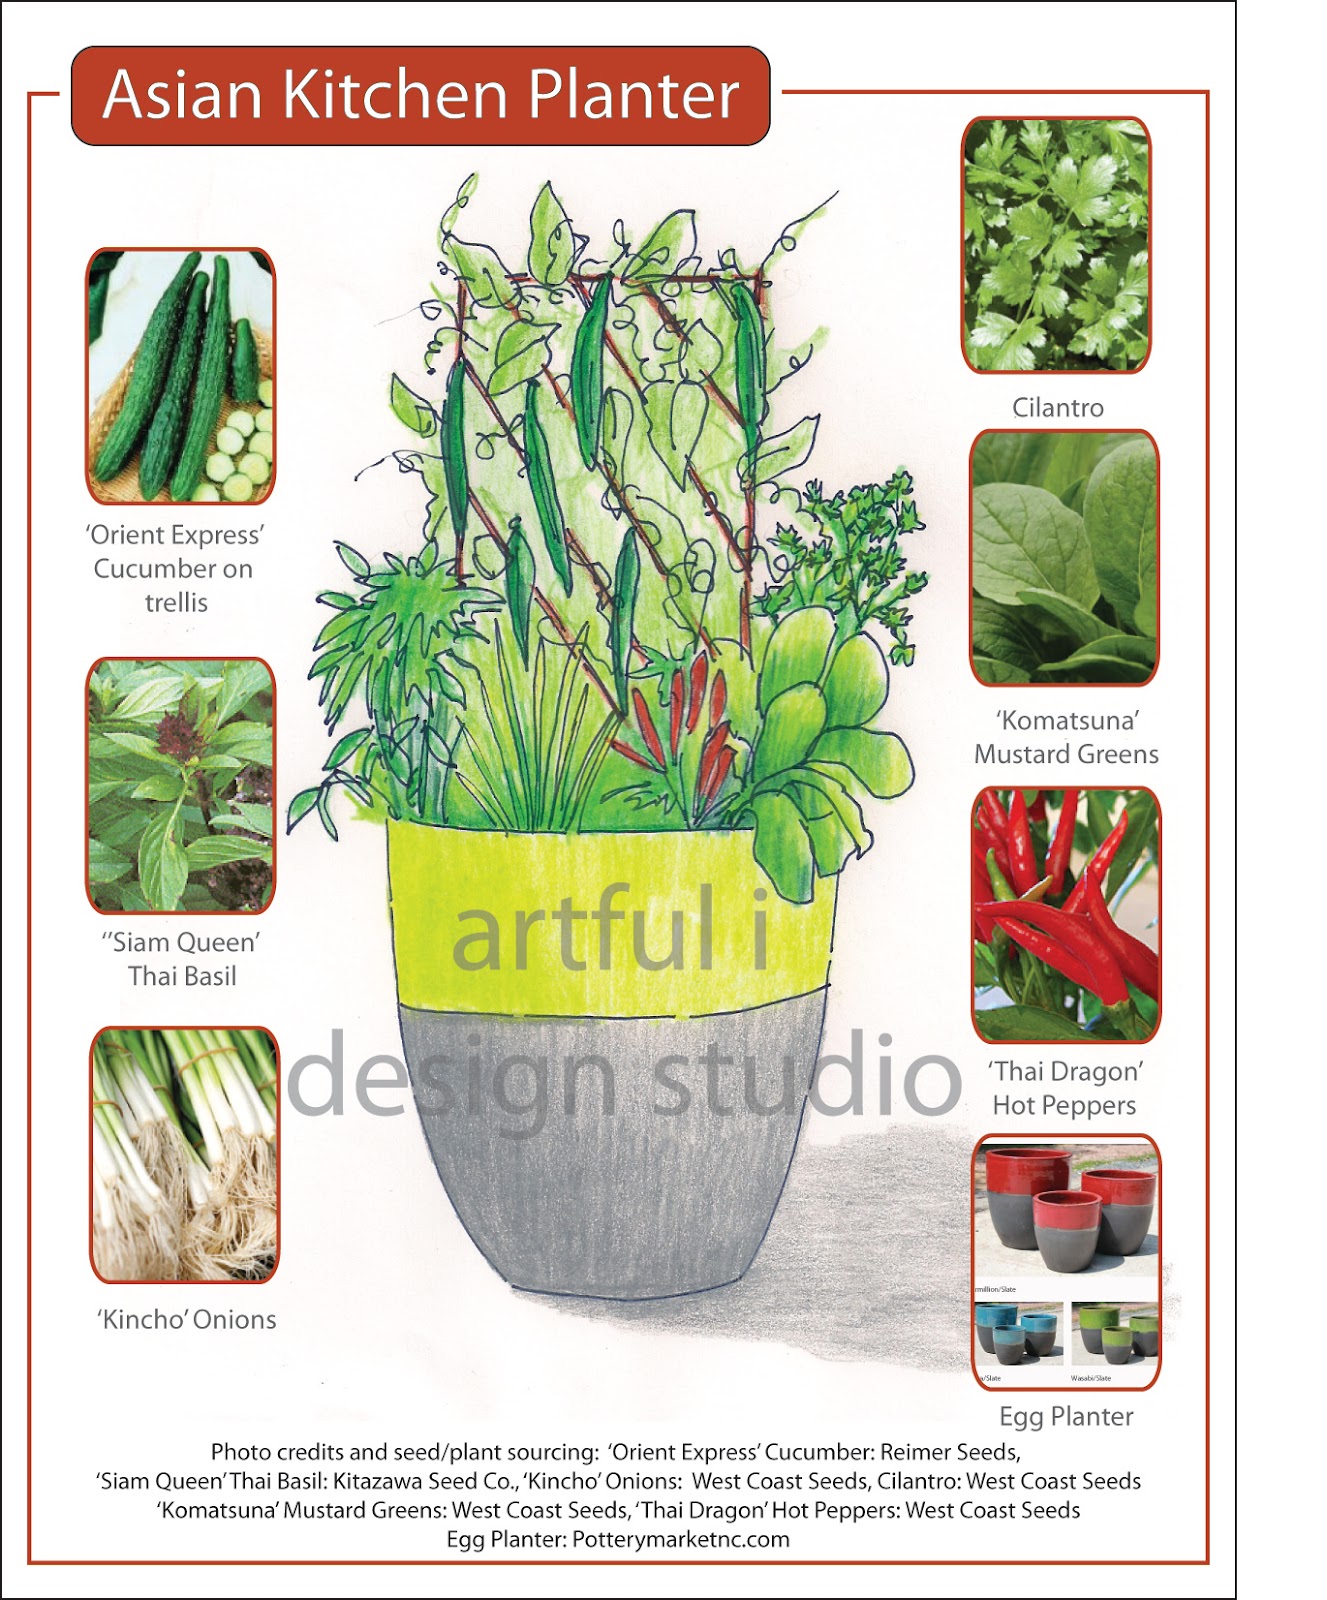
Asian Kitchen Planter Freebie

If you noticed on my last post, I love to come up with planter "recipes." Since edible gardens are such a hot topic these days, I came up with a new planter that I'd like to share with you:

This recipe uses specific cultivars that are very popular in Asian, mostly Thai, cuisine. If you have trouble finding all the cultivars in your garden center, feel free to switch to one that is available and appeals to you. If you would like a pdf version of this recipe, please post in the comments below. As always, let me know if you create this planter -I would love to post your completed planter photos. Check back often, I have many more planters in the works!
Happy planting and eating!

Asian Kitchen Planter Diagram is property of Artful I Design Studio.
Please do not reproduce this graphic without permission.